
Why an engine block?
If your body diameter is the exact size of your engine, then you’re just weird. For those of us that are normal and have a larger diameter body than engine, we have to build an engine block to hold the engine so it doesn’t just fall out or shoot through the nose cone during flight.
What does an engine block look like?
Basically the engine block I designed was made of two disks and an engine clip. The two disks were made out of old CD’s and the engine clip was a large paper clip.
Please explain — I’m lost
Well, basically the first disk (closest to the nose cone) keeps the engine from shooting up into the nose cone during flight. The second disk (closest to the bottom) keeps the engine relatively perpenticular to the ground so it fires straight. Finally, the engine clip keeps the engine from falling out during pre-launch or after the thrust phase of a launch.
Could you give me a diagram?
Of course — here’s a rough diagram of the parts I described above…
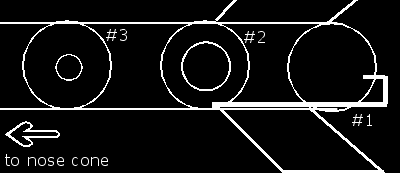
Above, #1 is the engine clip, #2 is the disk that stabalizes the engine, and #3 is the disk that keeps the engine from moving up the rocket shaft.
How’d you make your disks?
At first I was just going to use cardboard, but I decided that CD’s were much more durable. So basically I just put my body tube on a CD, drew around the body to make a circle, then cut out the circle. Obviously this method will make the diameter of your disk a little big, so trimming is required. If you have problems with the CD being too brittle, try warming it up briefly with a lighter. Also, you’ll notice that disk #2 has a bigger hole in the middle than disk #3 — this is EXTREMELY significant. The hole in disk #3 should be smaller than the engine you plan on using because you want the ejection phase to shoot up the shaft but you don’t want the engine itself to pass through the hole. In disk #2, since it’s holding the engine you want the hole to be almost exactly the same size as the engine. How is that possible? Don’t try to cut the hole bigger — it won’t work. Just grab a lighter, heat the middle of the CD (lightly — don’t make it burn) then take a pencil and push the sides of the center toward the edges to increase the diameter of the CD hole. Remember it’s a lot easier to make the diameter bigger than smaller, so take your time and continually check your diameter against the diameter of the engine. Also, keep in mind that the engine’s diameter is a few millimeters larger at the end than at the top, so be careful of that.
How can I make this a tight fit?
If you were just cutting your CD’s and trying to get a perfect fit, it’d be nearly impossible to get a snug fit — which is something you need. What I did was I took small strips of duct tape (in about a 1 inch strand long by 1/4 inch tall) and put it around the edges of the CD — this does two things. First, it makes the edges of your CD uniform so you don’t have shards sticking out of the CD. Second, duct tape gives easier to pressure than a CD, so you can force the CD in and get a tight fit with duct tape. Trust me on this — it’s the best way to get a good fit.
I don’t think this duct tape is going to stay…
You’re exactly right — you need to reinforce your disks so they don’t move during launch. But there’s one important step you have to consider first — if you’re going to use an engine clip (and you should) make sure you leave a small indentation on disk #2 so your clip can be behind the disk but come through it to hold the engine. If you don’t understand the concept of an engine clip look below at some of the pictures of my engine block. Okay, to answer the problem about the disks moving… What I did was I got each one in place, dripped wood glue (it dries fast and is pretty strong) onto the area where the disk met the body tube. Since we used duct tape, we shouldn’t have any holes for the glue to drip through and it should dry and make a good seal with the body tube so the disks don’t move. One thing to keep in mind — make sure you don’t glue over that indentation in disk #2 you made for the engine clip — it’s very important. Once you drip the glue down, take a pencil and just wipe it around so it touches all the edges of the disk to the body tube. Also, make sure that you positioned your disks correctly — before you glue try to check the distance of your two disks and the bottom of the rocket.
Makes sense? This is an absolutely vital step that you must do if you want your rocket to work. Remember that you don’t have to do exactly what I did — I’m being creative and coming up with ways to deal with the problem of having a body tube that won’t accomodate an engine — try to think of a creative way to deal with the problem. Keep in mind I’m just trying to give you ideas on what to do — you don’t have to follow what I say. Just as a side note, you might want to have two disks shaped like disk #2 only because one disk does not completely stabalize the engine correctly.
One last thing: I twisted my engine clip into a spiral in an attempt to make sure it doesn’t fall out — just try to find a creative way to make the engine clip do it’s job but doesn’t fall out easily.
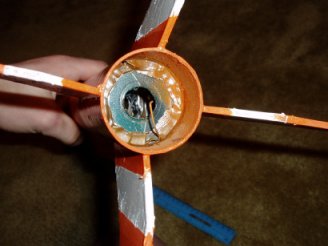
Disk #2 and the engine clip — you can see the duct tape and the seal between the disk and the tube.
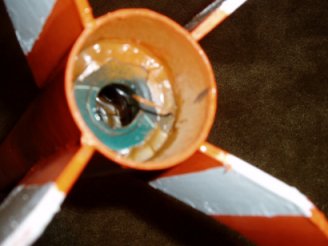
Disk #2 with the engine clip — notice how the engine clip comes out through disk #2.
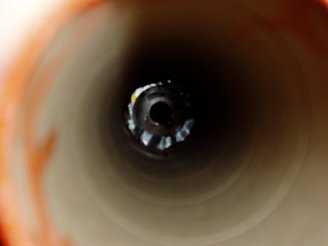
This is what disk #3 looks like from the nose cone’s point of view. I glued the disk from the other side (from the tail end) so you can see how I did the duct tape pretty well here.
Next Page: Recovery System
Back to: Nose Cone
Back to the Table of Contents

