
Initial Comments
If I could pick one aspect of my rocket that took the most time and planning it would easily be the nose cone phase. What’s a nose cone? If you look at a rocket, it’s the tip of the rocket that’s usually shaped like a cylinder. I’ve hear of rockets having semicircle cones and other shapes, but I decided to go with the traditional cone shape.
How’d I know the cone’s dimensions
Well…I didn’t. I just sat my rocket body down, estimated how tall I wanted my cone, and went from there. Although I realize this isn’t a very scientific approach, I didn’t have any outside advice on the propotions of my nose cone or anything like that.
How’d you make your cone?
Before I get to that, I want to talk about the design of my cone. I obviously knew the diameter of my cone would be the diameter of my body tube, and I knew my height, so basically the first step was to figure out what the cone would look like:
“h” stands for the height of the cone, “r” is the radius of the cone, and “s” is the length of the side of the cone. For me, my radius was 2.5 cm, my height was 15 cm (I just picked this value because it seemed like a good height), and using the pythagorean theorum (s^2 = r^2 + h^2), my side length was 17.85 cm. Also, you’ll want to find circumference (2 * pi * r), which turned out to be 15.7 cm.
Cumcumference’s Purpose
Basically before you make your nose cone, you need to make a paper design of it. In order for that to happen, you have to figure out how to draw the correct shape on paper to cut out and tape together that will form a cone. The solution? Imagine that you’re taking the cone in the above picture and cutting it down the side…once you lay it out you’ll get a shape that basically looks like a piece of pie. Your “s” becomes the pie piece’s radius, and we’ll use the circumference to determine the arc length of the pie piece. Confused? Just keep going and it’ll all fall into place.
Alright, here’s our ‘pie piece’… If we want to draw it, we have to find angle T… T = C/(2 * pi * s)…which gave me an angle of 50 degrees. (Note: use the values for C and s from the previous picture — you do not have to re-figure them).–>
Yay! We found the angle — so what?
Ah yes, now comes the fun part. In order to draw your pie piece, you’ll need a compass, protractor, and a ruler. Follow the following instructions to make your cone
- Grab a big piece of paper, and draw a line the length of “s” (from the above pictures)
- Set the middle of the proctrator down onto the end of the line you drew, make sure the protractor is parallel to the line and the bottom of the protractor is butted up against the line you drew
- Take your ruler, start it at the middle of the vertex and lay it across the protractor and paper so it makes the correct angle (angle T from above).
- With your ruler in place at the correct angle, draw your second line that makes the two sides of your pie piece. Note: you may have to lightly draw your line and then shade it in darker later because you might find that your ruler moves very easily.
- Take your compass with the needle side in the vertex of your angle (where the two sides meet) and stretch it to the end of one of your lines.
- Move your compass to the end of the other line, which will complete your piece piece.
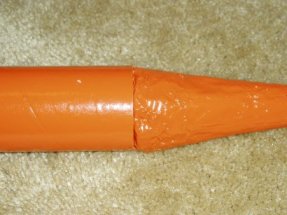
Congrats, now you’ve got a cone made. Cut it out, and just connect one side to the other with tape. You should find it difficult to make it perfectly connected at the top of the cone, but try to make the cone connected the best you can.
Life After A Paper Cone
Although many rockets use paper as their cone material, I just couldn’t bear the thought of it…I wanted a bigger and better cone. After trial an error with elmer’s glue, wood glue, and sprayable foam, I discovered that the best way to come out with a good cone is to use a hot glue gun. Basically what you do is set the cone in a plastic bottle or milk jug, make sure the tip of the cone is closed up (with tape at least), then just fill the entire cone with hot glue. This sounds a little crazy, and it will take quite a bit of hot glue, but it definitely gives good results. The only downside is that your rocket becomes much heavier.
Hoe glue — check. Now what?
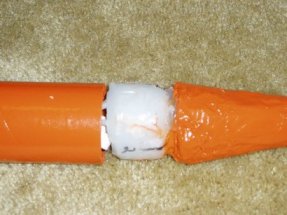
Once the glue dries, just soak the cone in water to remove the paper mold and your nose cone is basically done. The only other step is to make a cylinder that fits into your body tube so that your nose cone doesn’t fall out easily. Making a paper cylinder is much easier and I won’t bother covering it here, but basically you just make a circle with the proper diameter and tape a strip of paper around that circle…make sure your tape covers any holes that the hot glue might drip out of. After you make your cylinder, glue it to the nose cone and use an xacto knife to get a snug fit — if you don’t need to use an xacto knife your nose cone is probably too small.
How does the elastic cord connect?
If you do decide to do a parachute, you’ll need it to be connected to your nose cone. The solution is to go to Wal-Mart’s arts and crafts section and buy some plastic rings (sounds weird, but they do carry them) and just place one or two rings into the cylinder while it’s drying — make sure you leave about half of the ring above the surface so you can tie an elastic cord around it.
Did you encounter any problems?
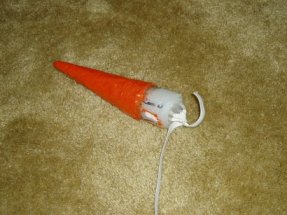
Absolutely — it took me several weeks to think up the hot glue thing. If you’re feeling really adventurous you can hollow out your nose cone and cyliner to reduce weight (it seriously does become heavy). The other big problem is correctly centering the nose cone with the cylinder — if it’s off center, your nose cone will look weird in the rocket. If you mess it up, just use your xacto knife and some elbow grease and cut the cylinder off the nose cone and try again. It’s trial and error and you can only do this right with experience. This is by far the most difficult step so please do not get discouraged if you have trouble with this step. Once you finish this, it’s all downhill from here. Below is a picture of my nose cone with it’s elastic cord attached.
Next Page: Engine Block
Back to: Fins
Back to the Table of Contents

